Designing a Concept AI Agent to Cut Photo Culling Time by 50% While Keeping Photographers in Control
Manual photo culling is one of the biggest time drains in a photographer's workflow. Repetitive, subjective, and impossible to delegate.
Through a structured AI/UX design program, I developed a concept prototype for Adobe Bridge that learns a photographer's shooting style, auto-culls with explainable reasoning, and keeps the human in control, targeting a 50% reduction in culling time while maintaining user trust.
Try the above demo inline. For the best experience, view it on desktop or laptops.
TLDR Overview
Role: Concept Product AI Designer (AI design course, non-production)
Team: Independent project with mentor feedback
Timeline: 8 weeks total (5-week course + 3 weeks of portfolio work)
Challenge: Professional photographers spend hours manually culling and renaming large photo libraries. This project explored how an AI sidekick could accelerate the process while preserving creative control.
Focus Areas: User research, journey mapping, JTBD framing, interaction design, explainability principles, high-fidelity prototype
Impact (Target Outcomes): Concept demonstrated how AI could save photographers significant time while maintaining trust and creative control, with projected gains in efficiency, accuracy, and user confidence.
Target Impact
Projected performance metrics demonstrating efficiency, accuracy, and trust. Target figures pending implementation and user testing.*


Project Overview
This concept looked beyond feature tweaks to imagine how AI could reshape an entire workflow in Adobe Bridge cutting repetitive tasks while reinforcing user trust and control. The focus was on human-centered AI design, not just efficiency.
My Role in 2025
Applied AI design principles to streamline workflows in Adobe Bridge
Used LLMs (ChatGPT Plus, Gemini Pro, Claude Pro, Perplexity Pro) and other AI tools to generate, refine, and evaluate design variations
Balanced automation with human control and explainability
Earned certification in Master UX Design for AI
Credential
Completed Aug 2025.
A 5-week program focused on Conversational AI, Multimodal AI, and Human-Centered AI design.
Project Selection
Targets a large, viable market
Offers monetization potential for Adobe
Aligned with portfolio’s B2B orientation
Built on 37 years of photography experience, giving me unique insight into the problem space
Design for Human-AI Alignment
I began by identifying target users with their Jobs To Be Done (JTBD) to ensure we’re designing for real human problems and not just “AI-washing”.
User & Jobs To Be Done
Persona: Phil, event & travel photographer, represents pro users managing thousands of images per shoot.
Goal: Save time without losing creative control.
Pain points (mine too): Late nights culling near-duplicates, renaming files, and batch-editing just to stay organized.
JTBD: Organize folders, select best shots, apply quick batch edits, and rename files consistently.
AI Learnings
Used NotebookLM to synthesize pain points and map them to JTBD.
Learned to frame AI as augmentation, not automation, ensuring photographers keep control.
Below: Phil’s needs defined the core AI opportunities: faster culling, style-aware edits, and transparent reasoning.
Define the Project & Use Case
I used NotebookLM to draft and refine a new Project and Use Case Definition, also summarized below in the new sticky notes.
Project: an AI assistant to cull, rename, organize, and first-pass edit photos; augmenting, not replacing, creative control.
Cuts 50%+ of repetitive tasks while building trust through explainability, personalization, and control.
Research & Validate Adobe Bridge vs Lightroom
Perplexity Pro’s research showed that photographers use Lightroom and various AI tools for photo culling. But for Phil and other users, research showed this as an opportunity to streamline the culling process with Adobe Bridge.
Opportunity:
Event photographers shooting 2,000-8,000 images per session with 4-6 hour manual culling processes
Commercial studios managing 50,000 + image libraries across multiple drives and projects
Market size: estimated 100,000 + professional Bridge users globally based on Adobe's 32.5M Creative Cloud base
Additional Perplexity Pro research supported building the assistant into Bridge:
15-20% of professional photographers prefer direct folder control and non-catalog workflows, which is not possible with Lightroom, especially for high-volume events and commercial shoots
Bridge users face unique bottlenecks in Al tooling and most solutions target Lightroom's catalog-based workflows
This represents an underserved but substantial Adobe Bridge market segment with clear, unmet needs
Below: I used Perplexity to research the data, ChatGPT to parse the generate the initial table, and Gemini Pro to refine the matrix.
| Bridge vs Lightroom Comparison | ||
|---|---|---|
| Feature / Characteristic |
|
|
| Import Step | ✅ No import needed | ❌ Required before culling |
| Catalog System | ✅ No catalog – uses file system; no files duplicated | ❌ Catalog required; files duplicated |
| Risk of Catalog Corruption | ✅ None – no catalog means no corruption risk | ❌ Yes – if files moved outside |
| User Control | ✅ High – real-time file sync | ❌ Limited – external moves break links |
| Speed to Start Culling | ✅ Fast – no setup | ❌ Slower – import + previews |
| Metadata Handling | ✅ Saved to file or XMP | ❌ Stored in catalog |
| Folder Organization | ✅ User-controlled via OS | ❌ Organized via collections |
| File Access | Direct from folders | Through collections |
| Ideal Use Case | Manual culling, fast edits | Large photo libraries |
| Learning Curve | ✅ Lower – file browser UX | ❌ Higher – catalog behavior |
| AI Integration Potential | ✅ Ideal – flexible metadata workflows | ❌ Limited – catalog friction |
Map the User Journey
I created a new User Journey Map in Smaply, which proved to be quicker and more manageable than the older journey map in BuildUX.
Below: I focused on Stage 3 - Culling (in purple highlight), as research indicated it was a major pain point that significantly impacted ROI related to users' emotions before and after AI implementation.
Map the AI Capabilities
NotebookLM parsed data for AI Capability Mapping, aligning the photo culler's features with relevant AI technologies. Our lesson plans covered various AI technologies, giving examples for each. With NotebookLM, I created the mind map below, and even more detail shows my AI Capability Map Matrix document.
By consistently using the same AI terms (like Recommendation Systems and NLU) when talking to developers, I aim to improve communication, build trust, and ensure everyone is on the same page.
Below: Purple box indicates the AI technologies used in this project. Gold box indicates those features and benefits associated to AI technologies.
Select Conversational & Multimodal AI
Define the Conversational AI Logic
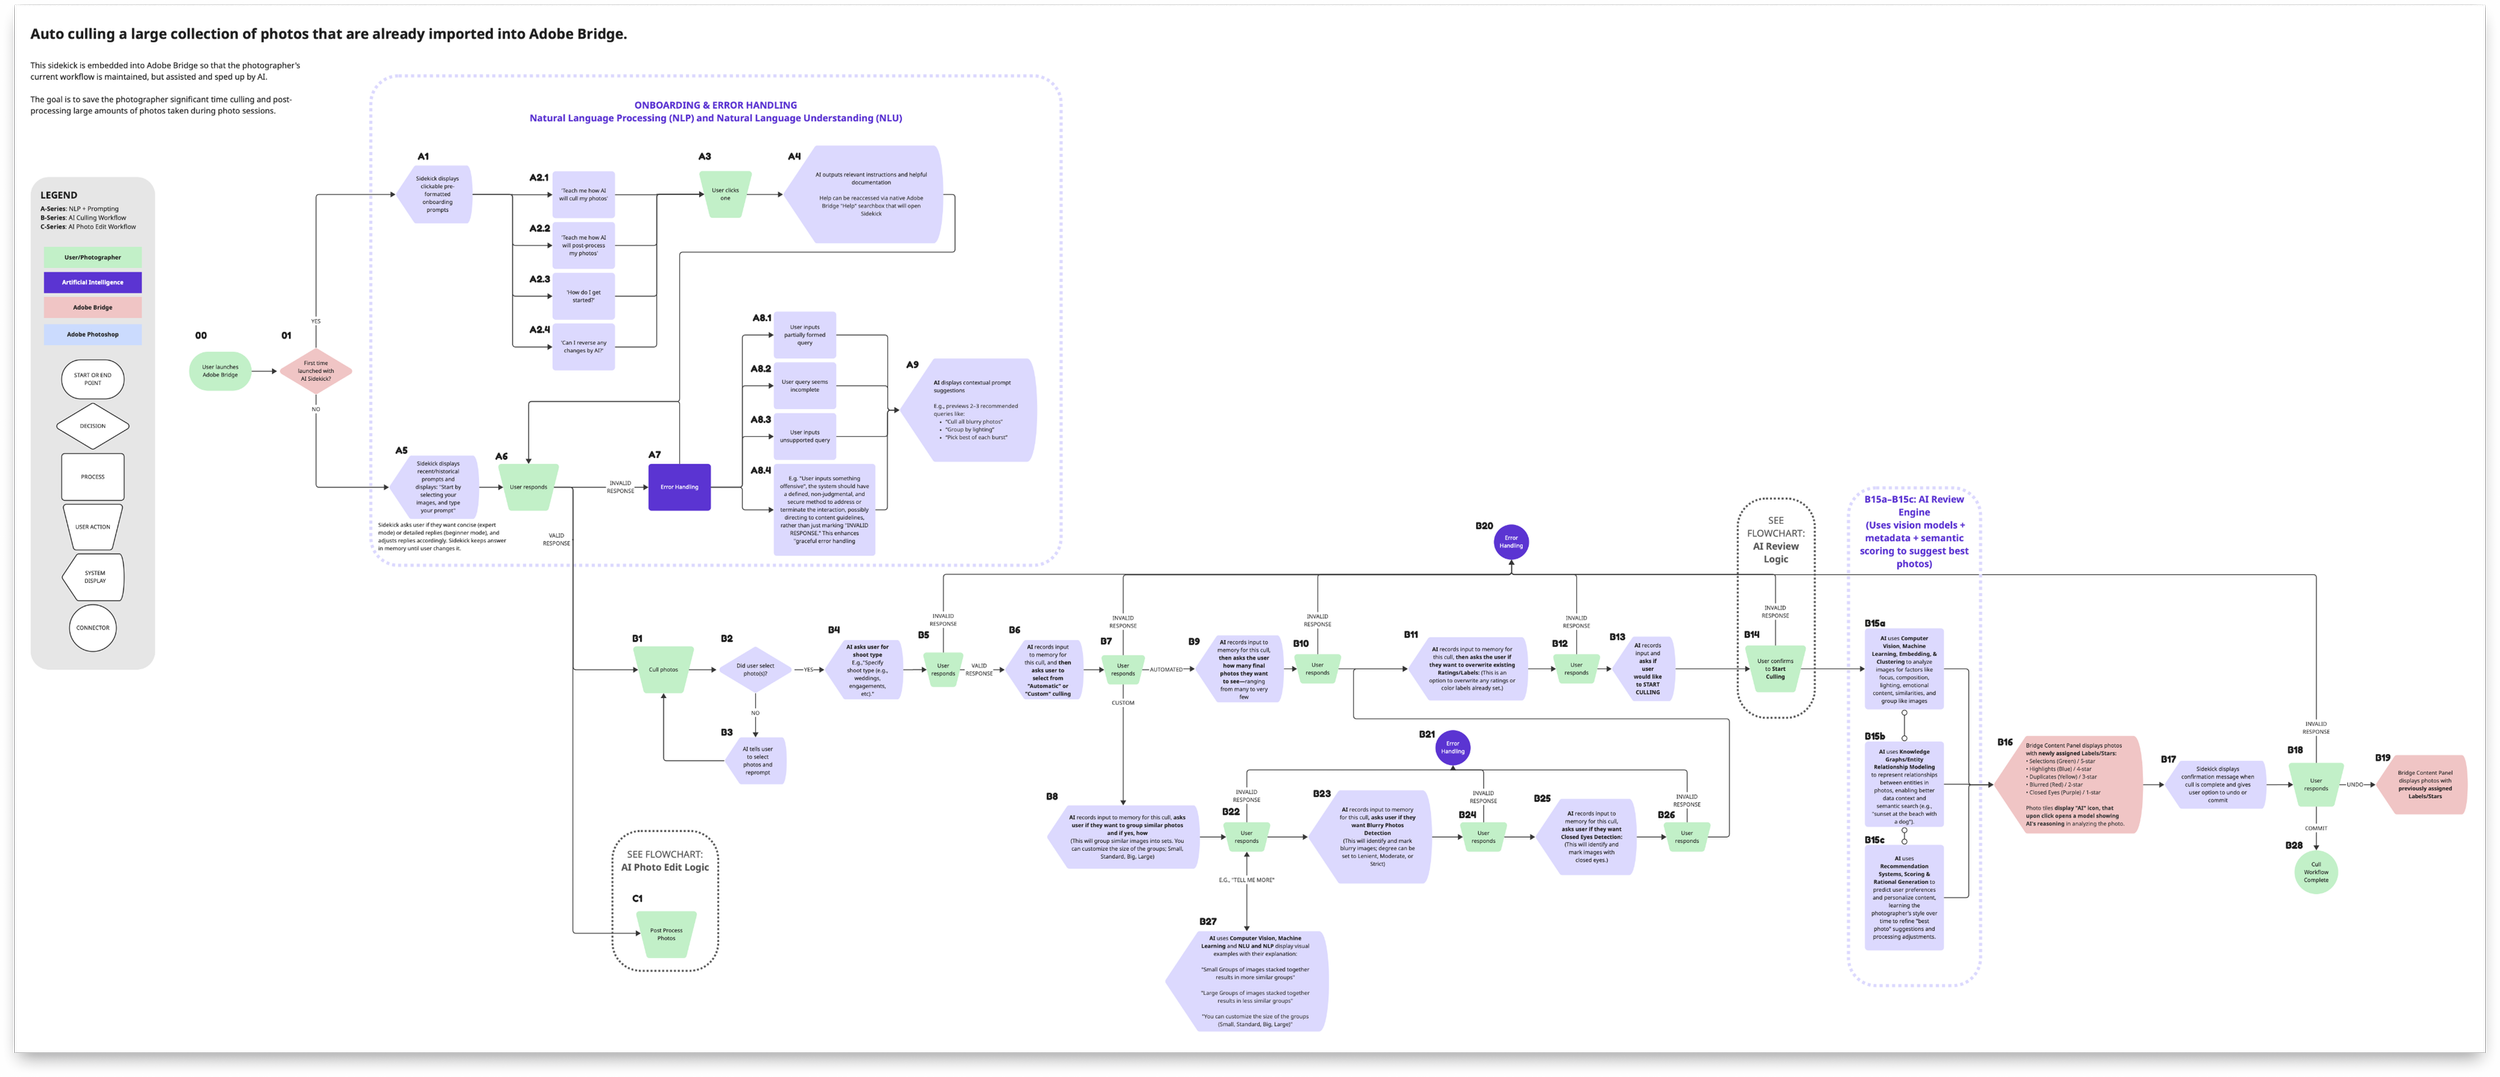
Adobe Bridge is powerful but can overwhelm new users with its many clicks and keystrokes. Culling photos can be complex and time-consuming, making it a perfect task for AI.
I decided to use a conversational chatbot as a sidekick, because it could help photographers see their images while using the sidekick to culling photos, pick the top 10% for review, etc.
Chatbot behavior is non-deterministic (unpredictable and doesn’t follow a set path), so I created flowcharts to map out:
Step-by-step interaction sequences
Decision points and system responses
Error states and recovery paths
Key moments of AI assistance
Design principles and user mental model considerations
These flowcharts became a solid base for my VoiceFlow conversational prototype.
Below: Conversational flowchart show the conversational logic for a user culling photos, and connects to the other two flowcharts below.
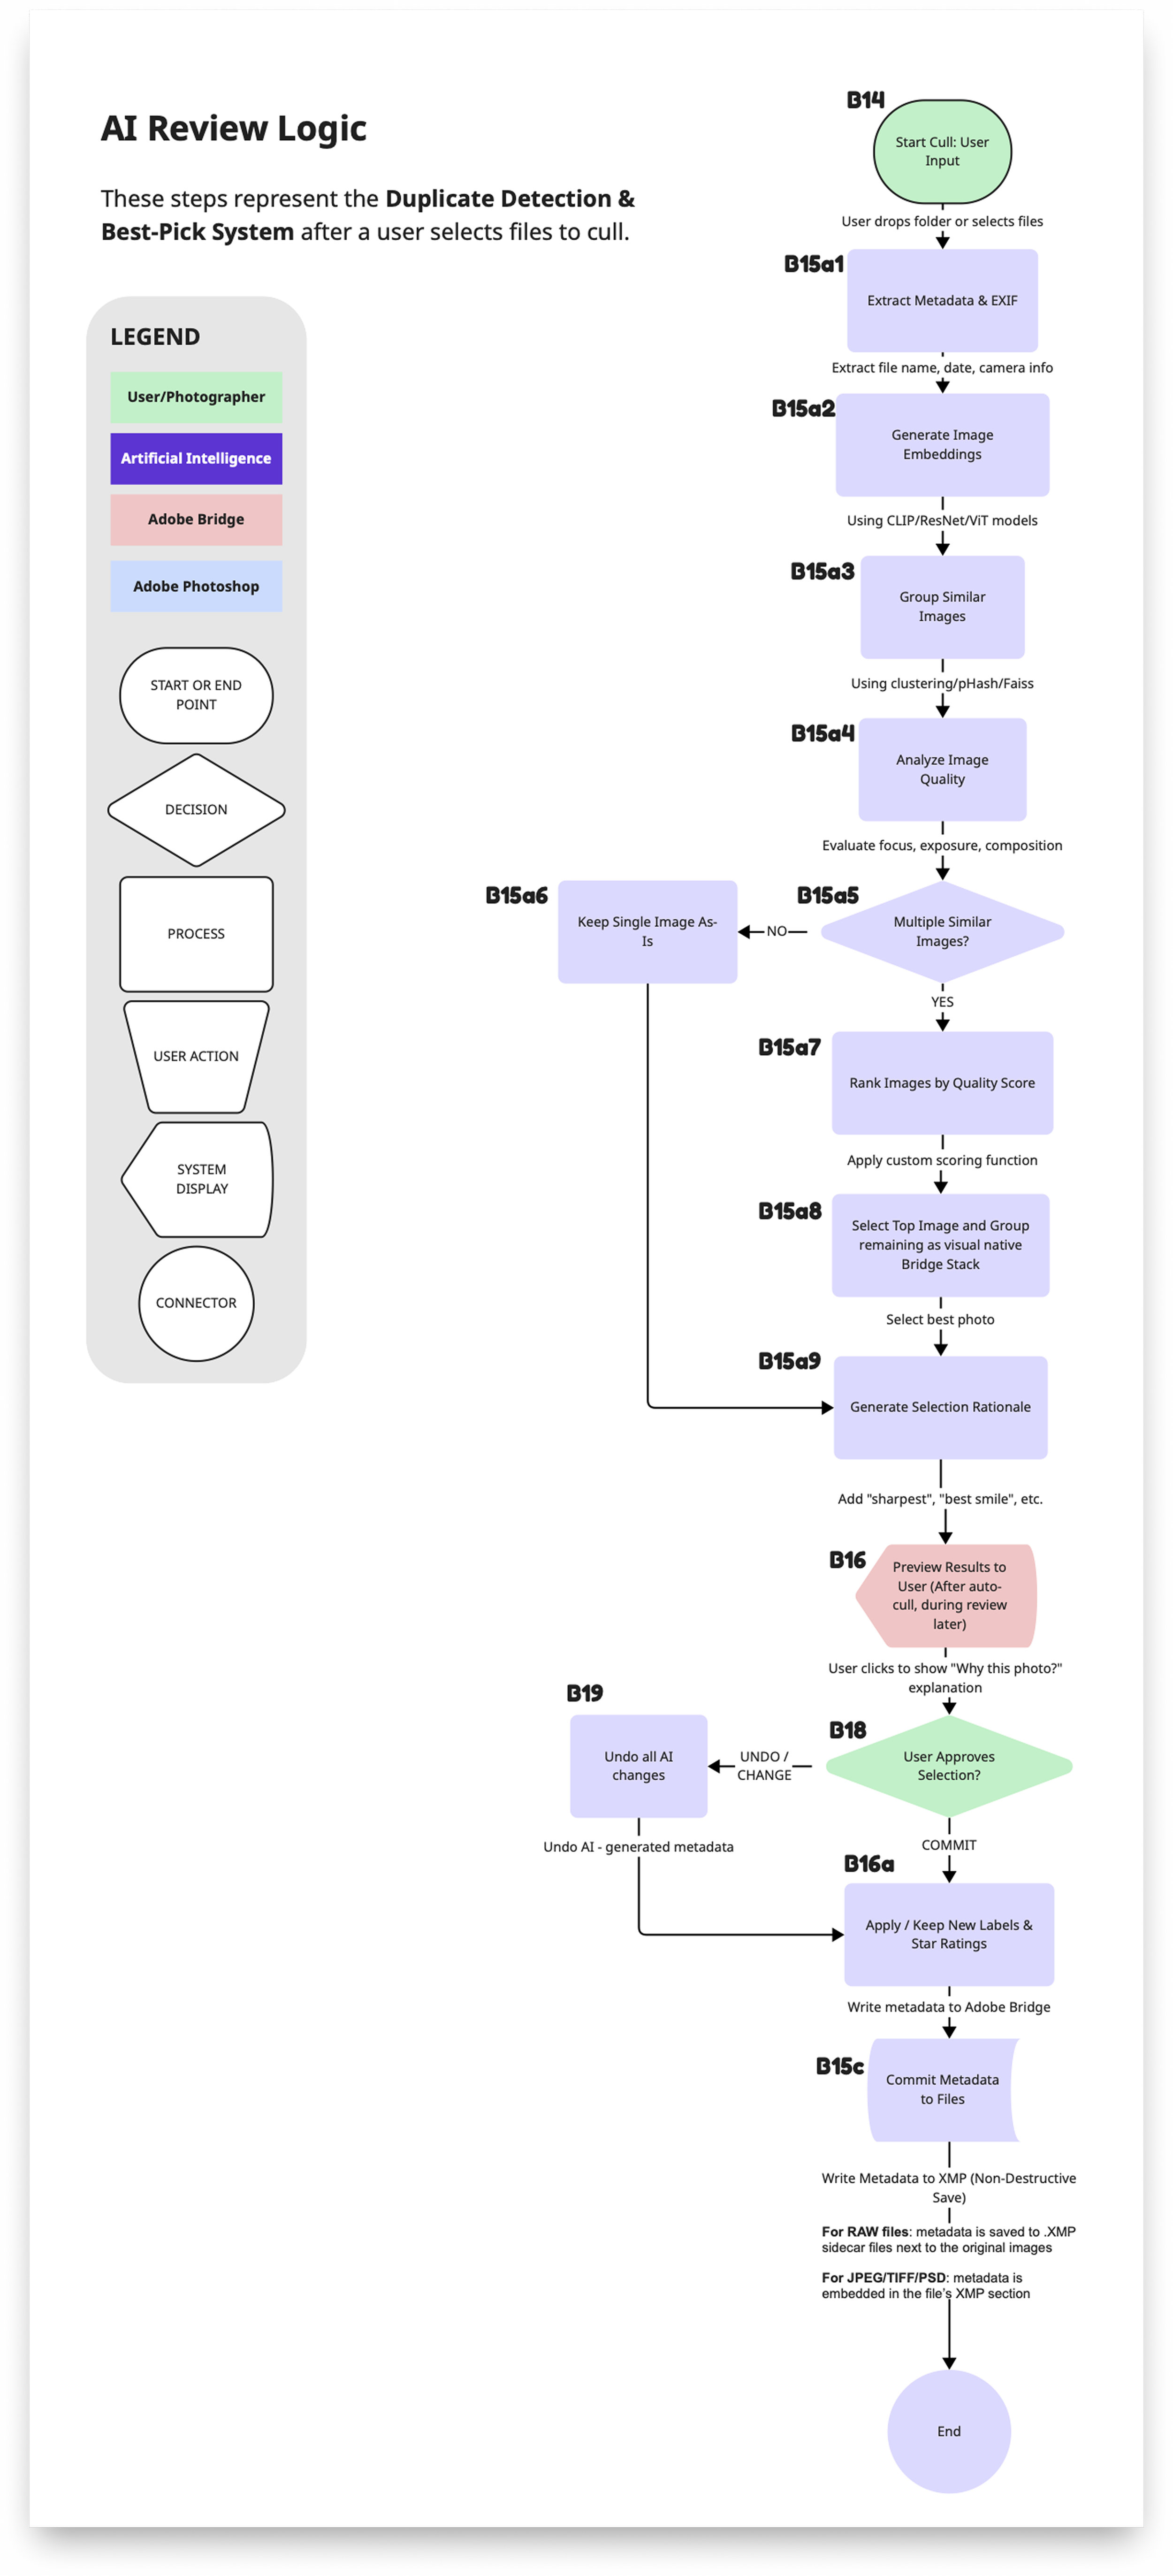
Below: Logic flowchart shows how AI processes duplicate detection and best-picks.
Below: I used NoteBookLM/Gemini to recommend how AI would automate the editing (post-processing) stage, shown here.
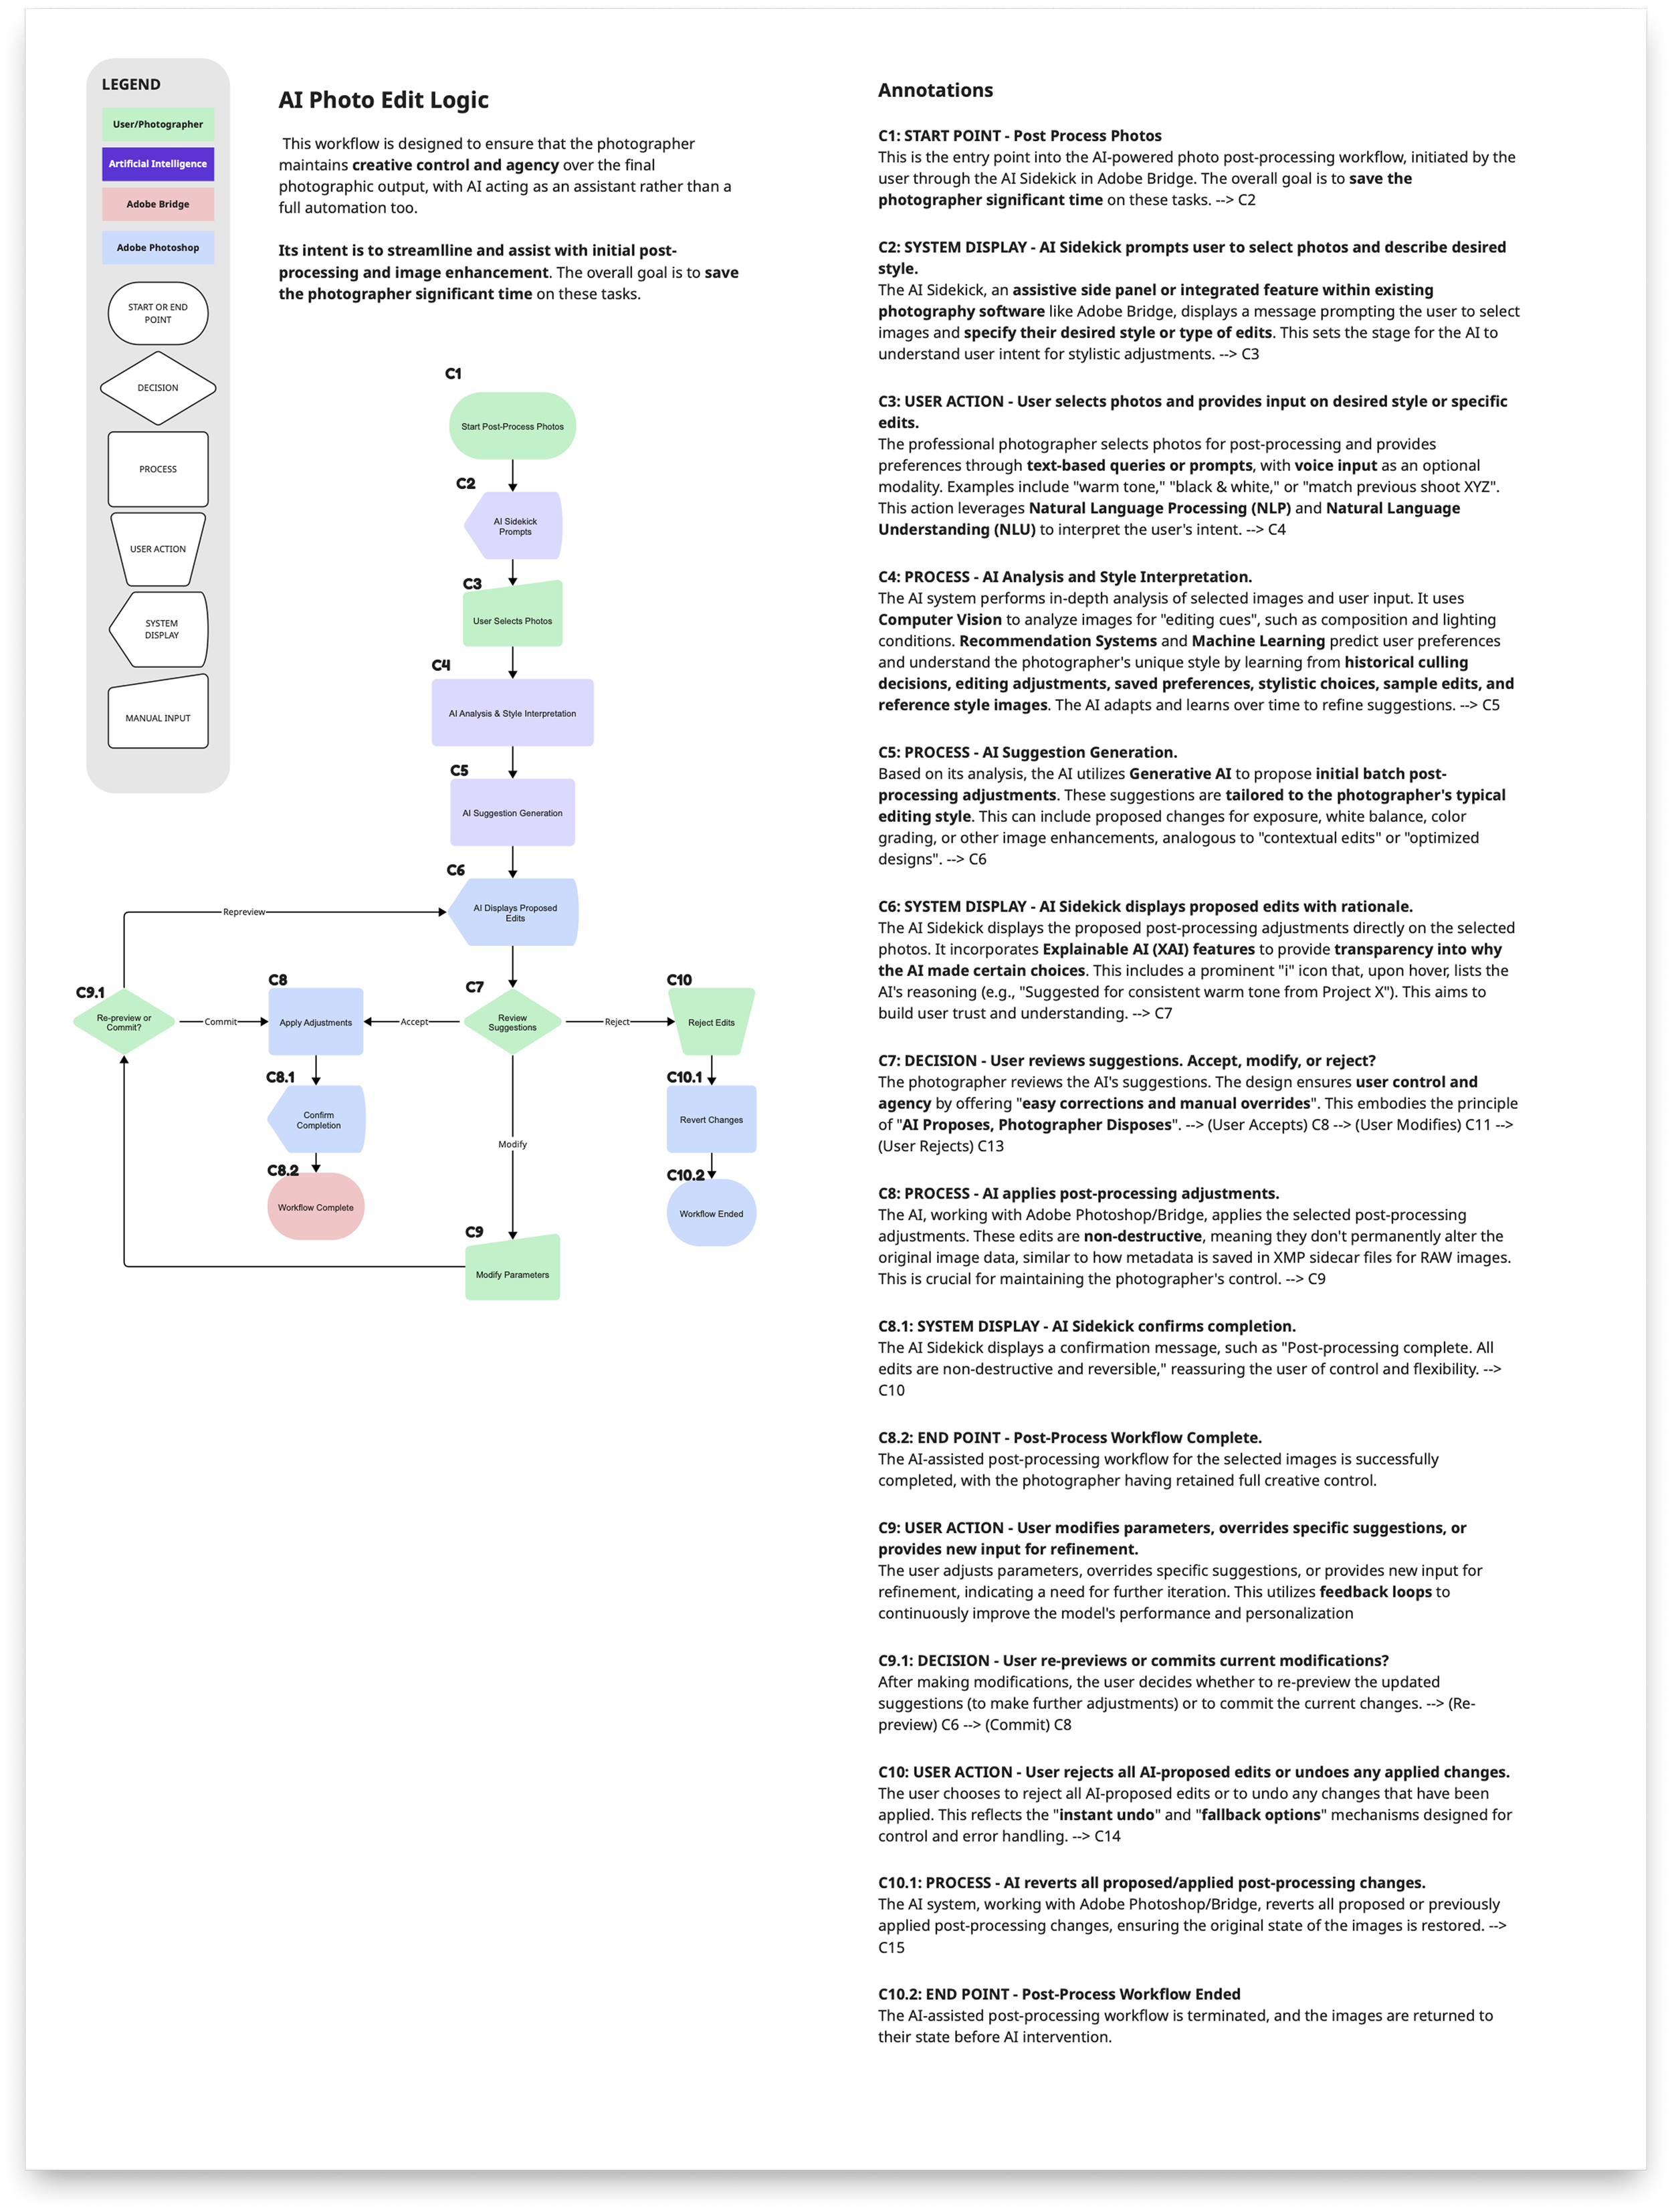
-
Upload Context: In NotebookLM (NBLM), I uploaded all the source files for context, including lesson notes and all previous assignments.
Prompt: I prompted NBLM to create a flowchart explaining the process in step 5 (Post-Process) of my user journey map. I instructed it to prioritize accuracy before it provides the output.
Output: NBLM initially presented the flow in text form, which I then requested to convert for Miro visualization.
Redo: NBLM gave me output that Miro converted into sticky notes. I didn’t want a sticky notes format, so I tried again, as detailed in step 5 below.
Miro AI: In Miro, I utilized the AI “Diagram or mindmap” feature, selected the “Flowchart” option, and pasted the NBLM output into the prompt box.
Create Flowchart: Miro generated the visual flowchart with the exception of the colors, based on the format of the others that I started in the Miro canvas.
Correct & Stylize: In Miro I reviewed and corrected any errors, adjusted the orientation, and added colors as needed.
Annotate: NTBM also generated annotations, which I reviewed and added next to the updated diagram in Miro.
Establish Hypothesis
I used NoteBookLM also to effectively identify key areas for my hypothesis, referencing my past assignments and lessons for context. These hypotheses guided my design and helped me select the use cases to highlight in the prototype. The resulting output from NotebookLM (found here) also informed the conversational AI that I prototyped later in Voiceflow.
User Needs & Expectations
Hypothesis 1: Photographers will readily accept AI suggestions if the system transparently explains the reasoning behind its choices (e.g., “This photo is suggested because of its sharp focus and leading lines”).
Hypothesis 2: Users will adopt the AI solution if it demonstrably reduces the average time spent on culling, renaming, and organizing by 50%.
Hypothesis 3: Users will appreciate personalized suggestions for culling and processing that align with their specific style and preferences, which the AI learns over time.
AI Interaction & UX
Hypothesis 4: An assistive side panel or integrated feature within existing software (like Adobe Bridge) will lead to higher adoption compared to a standalone application.
Hypothesis 5: Multimodal interaction (visual exploration, text-based queries, and optional voice input) will enhance the efficiency and user satisfaction of tasks like culling and renaming.
Hypothesis 6: Users will prefer AI acting as a “smart assistant” that augments their workflow rather than a full automation tool that takes over creative control.
Workflow & Trust
Hypothesis 7: Providing easy corrections and manual overrides for AI suggestions will build user trust and ensure creative control.
Hypothesis 8: The AI’s ability to identify patterns not easily visible to the human eye will provide valuable insights, aiding in efficient selection and organization.
Hypothesis 9: Clearly communicating privacy controls and data usage policies will mitigate user concerns regarding AI analyzing sensitive content.
Identify AI Design Patterns
Time to bring it all together and implement appropriate AI Design Patterns that adhere to relevant Design Principles for this AI Photo Culler, and how to integrate it with the existing Adobe Bridge application.
Define Human-Centered AI (HCIA) Design Principles
HCAI Design Principles are crucial for developing AI projects that focus on user needs, contexts, and emotions. They ensure AI systems are not just advanced but also user-friendly, reliable, and trustworthy. These principles are key to the success of AI initiatives, as many projects fail to deliver real value due to inadequate user focus.
From the lesson readings I drafted Design Principles that would:
Serve as a foundation for the product team to align on ethical standards and user and business needs, helping to avoid conflicts and encourage responsible AI development.
Provide a clear development roadmap, creating a shared understanding and consistent decision-making criteria.
Establish UX and functionality guidelines to aid in making informed choices about features and design.
Prevent redesign and redevelopment issues caused by unclear or missing basic guidelines.


Design Principle 1: User Control & Agency
AI Proposes, Photographer Disposes: Keep the human in the driver’s seat—every automation is reversible and explained. Builds appropriate trust.
Below: Click the Sensei button on the top right to toggle the assistant on or off, giving complete control over AI.
Below: Users can always control and hide the sidekick assistant when not needed or wanted, which offers intelligent and assistive suggestions including “How do I start?”
Below: Build trust by transparently explaining what will happen before, during, and after culling.
Below: Give users control by presenting intelligent contextual options and choices.
Design Principle 2: Transparency & Explainability
Show the Why, Fast: Surface a one‑line rationale and confidence badge for each suggestion so users see model thinking without digging.
Below: Clearly indicate every photo altered or suggested by AI, so users can quickly see reasons for AI selections.
Below: Show the reasons AI selected photos, to be transparent in its decisions and build trust.
Below: Default to on‐device processing: Clearly list data used and allow opt‐out of cloud training.
My flowcharts and Project Definition guided the agents responses regarding concerns with privacy and option out of cloud training. The video below tested how Sensei might respond.
Turn on sound to hear voiceover
Design Principle 3: Usefulness & Task Completion
Speed with Safeguards: Target 50 % workflow time savings while enforcing non‑destructive edits and instant undo.
Below: AI culling unblocks Phil’s workflow in a fraction of the time it would take for him to do himself.
Below: Safeguards in place: all changes are non-destructive and can be undone before and after committing the cull.
Design Principle 4: Human-AI Alignment
Learn My Style, Then Adapt: Personalization improves after every shoot, but users can reset or export their style profile at any time.
Below: Users can rate every AI suggestion and approve, reject, show more images like this, or never show images like this.
Below: Using ChatGPT-5, I tried vibe coding this exploration for the Style Profile that users can reset or export at anytime.
Design Principle 5: Error Handling & Recovery
No Dead Ends, Always a Fallback: Always enable workflow continuity through graceful degradation, offline fallbacks, and clear recovery from AI misfires.
Below: Clear error, originals safe, options given.
Below: Explains cause, offers fallback, protects originals, gives options.
Vibe Code & Prototype
Before finalizing a prototype method I tried several vibe coding tools to see how well they replicated Adobe Bridge’s UI. Choosing the right tools is key to achieving faster and better results, so I like to try them out before committing. I’m excited to see how they evolve and improve in the future.
Below, I share my experiences with each tool through Loom videos. General summary for them all:
Vibe code tools help generate ideas or create initial apps, but designers are still essential for refining the output.
Each tool requires extra effort and tokens to improve the design to align with the final vision.
For pixel-perfect accuracy or to replicate an existing app, Figma currently remains my top choice for visual control.
Below: Loom videos describing my experiences trying out different vibe coding tools to recreate Adobe Bridge.
Create Demo Prototype
I ended building an interactive demo prototype in Figma, using screenshots of the real Adobe Bridge application combined with Adobe Spectrum Design System components. This gave me the most control, visual parity to Bridge, and accurate design intent. I’ll use this for the initial round of user testing.
Try the demo prototype below inline (works best on desktop or laptop).
My Takeaway
What I Learned About Designing for AI
AI is another tool that can help users achieve their goals if used responsibly and effectively.
To create effective solutions, we must first understand our users and the challenges they face.
Key AI design principles (User Control and Agency, Transparency & Explainability, Usefulness & Task Completion, Human-AI Alignment, Error Handling & Recovery) are essential for the success of AI products. Ignoring these principles may lead to low user adoption.
What I’d Explore Next
I’m excited to use AI to improve artifact creation, such as journey maps, design principles, flow charts, and UX flows.
I look forward to explore more vibe coding with product definitions, refining this project in Figma, and iterating into prototypes.
My Interest in AI/ML Product Design
AI and ML have reignited my passion for Product and UX design. The efficiency AI brings will enable me create amazing tools and products. And this is just the start and I wonder what will be possible when we reach AGI.
AI and ML still needs human oversight to review and refine their outputs, and I believe Product Designers are ideally suited for this role. We connect complex AI technologies with human-centered experiences, aligning user mental models with AI to ensure adoption. Without this connection, products risk abandonment.